If you have searched through all the apps/services that Integromat already supports and did not find the one you would like to employ in your scenario, you are in the right place. This DIY guide will help you to create an Integromat App for the app/service without writing a piece of code. If the app/service provides an API then all you need to do is put together a few declarations in a simple JSON format. Throughout this guide we will use our Virtual Library Demo API that you can freely experiment with.
TIP To see if there is an API provided by the app/service you would like to integrate, try googling this: API site:www.app-or-service.com, for example: API site:www.eventbrite.com
Let us start with a simple Hello world Module that will call our Demo API /helloworld endpoint without any parameters and simply pass the response: text Hello, World!. You can test the API simply by clicking the following link:
http://demo-api.integrokit.com/api/v1/helloworld
The API response containing the following JSON will open in your browser:
{"result":"Hello, World!"}
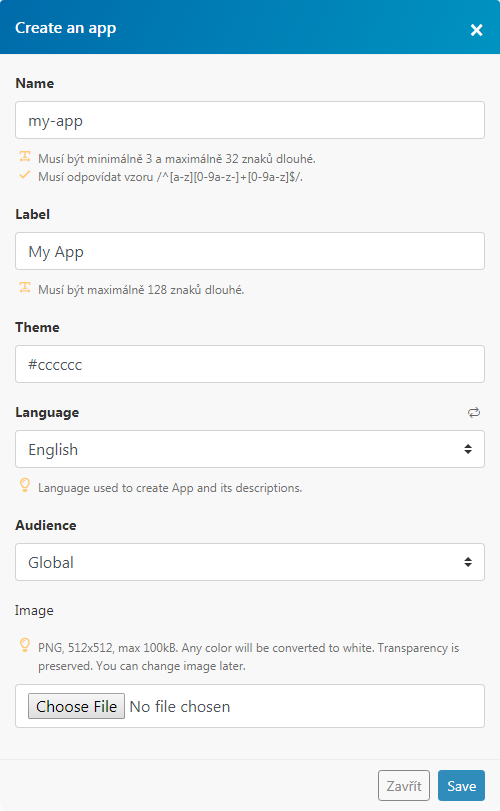
To create a new App, in the left main menu choose My Apps. The list of all your Apps will be shown containing few sample Apps (MailerLite, Slack and Tumblr) that you can later explore. Click the button Create a new App in the right top corner. A dialog will pop up, where you can set some basic properties of your new App like its name etc. For the moment leave default values and click Save.
Your new App will appear in the list. Click on your new App. A page with five tabs will be shown: Base, Connections, Webhooks, Modules and Remote Procedures - these are the main components your App will be composed of.
The Base tab contains basic setting used by the other components of the module. You can see a dummy JSON snippet:
{
    "baseUrl": "https://www.example.com"
}
Replace the url address https://www.example.com with the Demo API base url: http://demo-api.integrokit.com/api/v1 and press Ctrl+S to save changes.
{
    "baseUrl": "http://demo-api.integrokit.com/api/v1"
}
Note that the baseUrl key contains the API url without the /helloworld endpoint path that will be specified later in the Module settings.
More about the Base tab can be found in the Base documentation.
Modules are the key component of your App. They are basically wrappers around specific app/service functionality, which is exposed via an API endpoint. There are three basic types of modules: Action, Search and Trigger.
| Type | Description |
|---|---|
| Action | Use if the API endpoint returns a single response. Examples are Insert a book, Remove a book or Get book info. |
| Search | Use if the API endpoint returns multiple items. An example is List books that will find specific books according to search criteria. |
| Trigger | Use if you wish to watch for any changes in your app/service. Examples are Watch new book, which will be triggered whenever a new book has been added to the library |
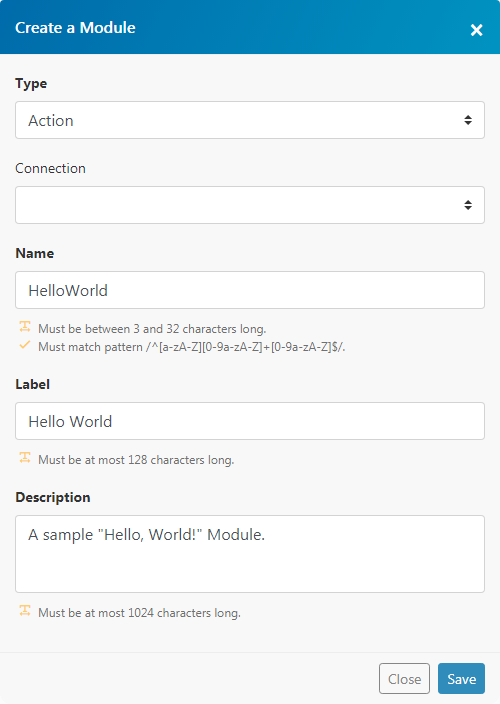
To create a new Module, click the tab Modules. The list of all Modules your App consist of will be shown (empty for now). Click the large button with plus sign in the right top corner and choose Create a new Module from the dropdown menu. A dialog will pop up, where you can name your Module, choose its type and provide some description. Fill the dialog as shown and click Save.
The new Module will appear in the list. Click the Module and a page with several tabs will be shown. Make sure the tab Communication is active and replace the content of the text area with the following JSON and save the changes(Ctrl+S):
{
    "url": "/helloworld"
}
The url key specifies the API endpoint path. The url will be joined with baseUrl specified earlier to produce the full url of the API endpoint: http://demo-api.integrokit.com/api/v1/helloworld.
Click the tab Mappable parameters. The JSON on this tab enables you to specify parameters of your module that will appear in the module settings panel. Our module does not require any parameters, so erase the content between the square brackets, leaving just empty square brackets and save the changes(Ctrl+S):
[]
Congratulations, you have just created your first Integromat App!
The App consists of one Action Module Hello World that calls the Demo API endpoint /helloworld and returns a Bundle containing the returned data, which is in our case the text Hello, World!.
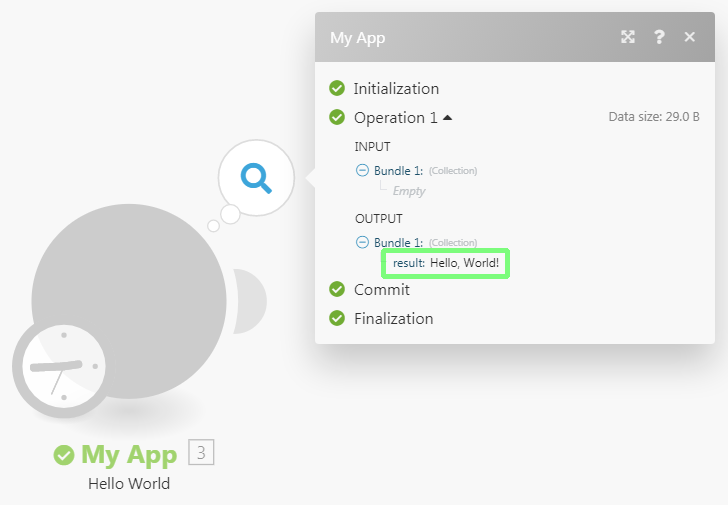
You can test your new App right away. Open a new browser tab, login to integromat.com, in the left main menu choose Scenarios and create a new scenario. Click the yet undefined “questionnaire” Module to bring up a list of all the Apps. Search for your new App by typing its name in the Search field: My App. Click your App and a list of all its Modules will be shown, currently just the newly created Hello World Module. Click the Module to select it. An empty module settings panel will pop up saying “There are no configurable options for this module.”. Close the panel and run the scenario. Click the bubbles above the module to pop up the panel with information about processed bundles. In case you have successfully followed this tutorial, you should see the following output of your new Module:
The Demo API endpoint /helloworld takes two parameters greeting and name. Click the following link to open the API response your browser:
http://demo-api.integrokit.com/api/v1/helloworld?greeting=Hi&name=Johny
The API should return the following JSON response:
{"result":"Hi, Johny!"}
So let’s make our Hello World Module configurable by adding the parameter greeting. Switch back to the Mappable parameters tab, replace the empty square brackets with the following JSON and save the changes(Ctrl+S):
[
    {
        "name": "greeting",
        "type": "text"
    }
]
This JSON specifies that the module will have one parameter called greeting of type text. More about parameters can be found in the Parameters documentation.
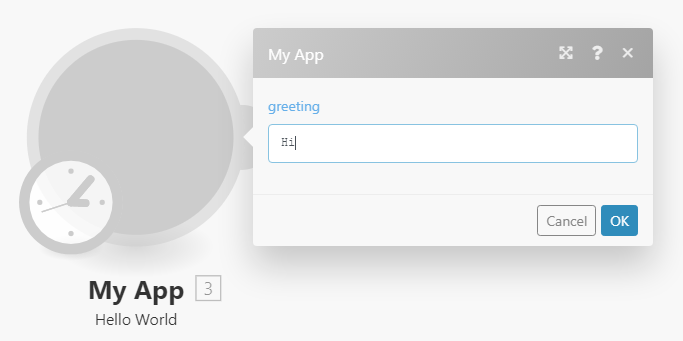
Switch to your scenario and refresh the browser window (F5). Click the Module to pop up its settings panel. The panel now contains one text field labeled greeting. Fill Hi!:
Press OK and run the scenario. Though, if you click the bubbles above the Module to pop up the panel with information about processed bundles, the module’s output will be identical as in the previous run. To change the output of the module, you have to pass the content of the greeting parameter to the API. Switch back to the Mappable parameters tab and click the Communication tab. To pass the parameter greetings to the API, you have two options:
You can either add the parameter to the url key:
{
    "url": "/helloworld?greeting={{parameters.greeting}}"
}
Or you can add a new key qs (query string) and add the parameter there:
{
    "url": "/helloworld",
    "qs" : {
        "greeting": "{{parameters.greeting}}"
    }
}
Save the changes (Ctrl+S), switch to your scenario, refresh the browser window and run the scenario. Click the bubbles above the module to pop up the panel with information about processed bundles, where you should see the modifed Module’s output:
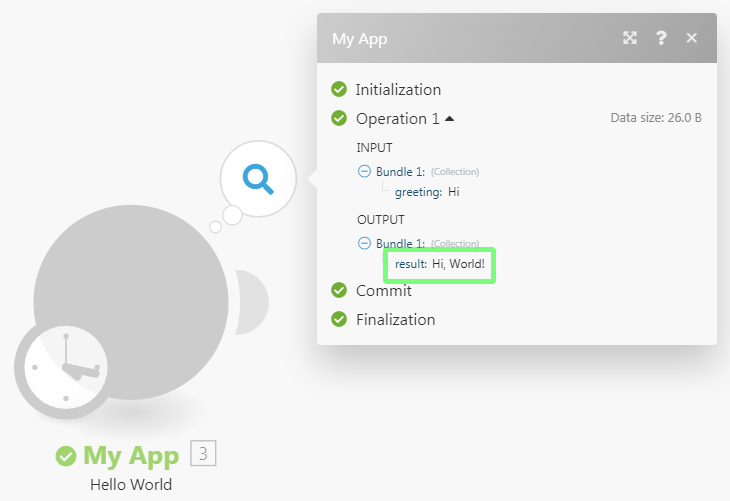
You can now practise your skills and try to add parameter name to your Hello World module.
APIs usually employ some sort of authentication/authorization to limit access to their endpoints. While the /helloworld endpoint was accessible without any authentication/authorization, the other endpoints of the Demo API will require an API key.
Let’s try to call endpoint /books that should respond with a list of books in the library:
http://demo-api.integrokit.com/api/v1/books
Without providing the API key, the response will contain the following error:
{"error":"Invalid or missing API key"}
To enable the user of your Module to specify her/his own API key (assuming each user has got her/his own API key to access the API), you need to create a Connection.
Click the tab Connections. The (probably still empty) list of all your Connections will be shown. Click the large button with plus sign in the right top corner and choose Create a new Connection from the dropdown menu. A dialog will pop up, where you can name your Connection and choose its type. Fill the dialog as shown and click Save.

The new Connection will appear in the list. Click the new Connection. A page with two tabs will be shown: Communication and Parameters.
A pre-configured communication will look like this:
{
    "qs": {},
    "url": "https://www.example.com/api/whoami",
    "body": {},
    "method": "GET",
    "headers": {
        "API-TOKEN": "{{parameters.apiKey}}"
    }
}
We have covered the basics about creating a simple module. Now, let’s see how to update our search module with a variable API token for each user.
Click the tab Connections. The (probably still empty) list of all your Connections will be shown. Click the large button with plus sign in the right top corner and choose Create a new Connection from the dropdown menu. A dialog will pop up, where you can name your Connection and choose its type. Fill the dialog as shown and click Save.
The new Connection will appear in the list. Click the new Connection. A page with two tabs will be shown: Communication and Parameters.
A pre-configured communication will look like this:
{
    "qs": {},
    "url": "https://www.example.com/api/whoami",
    "body": {},
    "method": "GET",
    "headers": {
        "API-TOKEN": "{{parameters.apiKey}}"
    }
}
This section specifies a simple request to determine whether the credentials entered by the user are valid or not. The most common way to validate the credentials is to call an API to get user’s information. Most of the APIs have such an API.
Once you finish communication configuration, you can go back to your Search module and click Attach connection. Once you select a connection, you can update your Search’s communication headers to execute request with variable API token like this:
{
    "headers": {
        "API-TOKEN": "{{connection.apiKey}}"
    }
}
Now, suppose that you want to retrieve a user. In order to do that, you
need to call the /users/:id method and specify the ID of the user you
want to retrieve. Here is how you would do that:
{
    "url": "http://yourservice.com/api/users/{{parameters.userId}}"
}
To let user choose the parameter, add this to parameters:
{
    "name": "userId",
    "type": "uinteger",
    "label": "User ID",
    "required": true
}
If you need to specify a query string parameter, you can do:
{
    "url": "http://yourservice.com/api/users/{{parameters.userId}}?includeAdvanced={{parameters.advanced}}"
}
But a better way is to use a special qs collection.
The headers, qs and body collections represent request headers,
query string parameters and body payload. The key is the variable/header
name and the value is the variable/header value. You don’t need to
escape values inside those collections.
The above request can be rewritten as:
{
    "url": "http://yourservice.com/api/users/{{parameters.userId}}",
    "qs": {
        "includeAdvanced": "{{parameters.advanced}}"
    }
}
Now, lets say that your server wants only logged in users to view all
other users and it wants an API-TOKEN header with a correct value. We
can use the headers collection to specify this header:
{
    "url": "http://yourservice.com/api/users/{{parameters.userId}}",
    "qs": {
        "includeAdvanced": "{{parameters.advanced}}"
    },
    "headers": {
        "API-TOKEN": "some-static-token"
    }
}
Cool, now we can make a request to a protected endpoint and retrieve a list of users.
NOTE: qs and headers are single level collections, meaning that
you cannot specify nested objects in their parameters:
{
    "qs": {
        "someProp": {
            "anotherOne": {
                "and-one-more": "THIS WILL NOT WORK"
            }
        }
    }
}
The example above will not work. But if you want dot notation for some reason, you can use it directly in the parameter name:
{
    "qs": {
        "someProp.anotherOne.and-one-more": "THIS WILL WORK"
    }
}
This will create a query string that looks like this:
?someProp.anotherOne.and-one-more=THIS%20WILL%20WORK
Suppose you want to retrieve all users, that are registered on your service. You can’t use Action, because it returns only single result. You will have to create a Search module for this.
The communication for Search is the same as for
Action, except Search has an iterate
directive, that specifies where are the items located inside the body.
For the next example, suppose that when you call /users on your
service, you will get a list of users in body.data.
{
    "url": "http://yourservice.com/api/users",
    "qs": {
        "includeAdvanced": "{{parameters.advanced}}"
    },
    "headers": {
        "API-TOKEN": "some-static-token"
    },
    "response": {
        "iterate": "{{body.data}}"
    }
}
This example will correctly output each user that was returned. But what
if you don’t want to output all parameters? You can use the
output section to manually map response to
module’s output:
{
    "url": "http://yourservice.com/api/users",
    "qs": {
        "includeAdvanced": "{{parameters.advanced}}"
    },
    "headers": {
        "API-TOKEN": "some-static-token"
    },
    "response": {
        "iterate": "{{body.data}}",
        "output": {
            "id": "{{item.id}}",
            "username": "{{item.username}}"
        }
    }
}
We have covered the basics about creating a simple module. Now, let’s see how to update our search module with a variable API token for each user.
This section specifies a simple request to determine whether the credentials entered by the user are valid or not. The most common way to validate the credentials is to call an API to get user’s information. Most of the APIs have such an API.
Once you finish communication configuration, you can go back to your Search module and click Attach connection. Once you select a connection, you can update your Search’s communication headers to execute request with variable API token like this:
{
    "headers": {
        "API-TOKEN": "{{connection.apiKey}}"
    }
}